

How to Guides:
1. How to start recording? Simple answer
Press "Start" in the "Big Red Button" to start recording
Press the "Stop" in the "Big Red Button" to stop

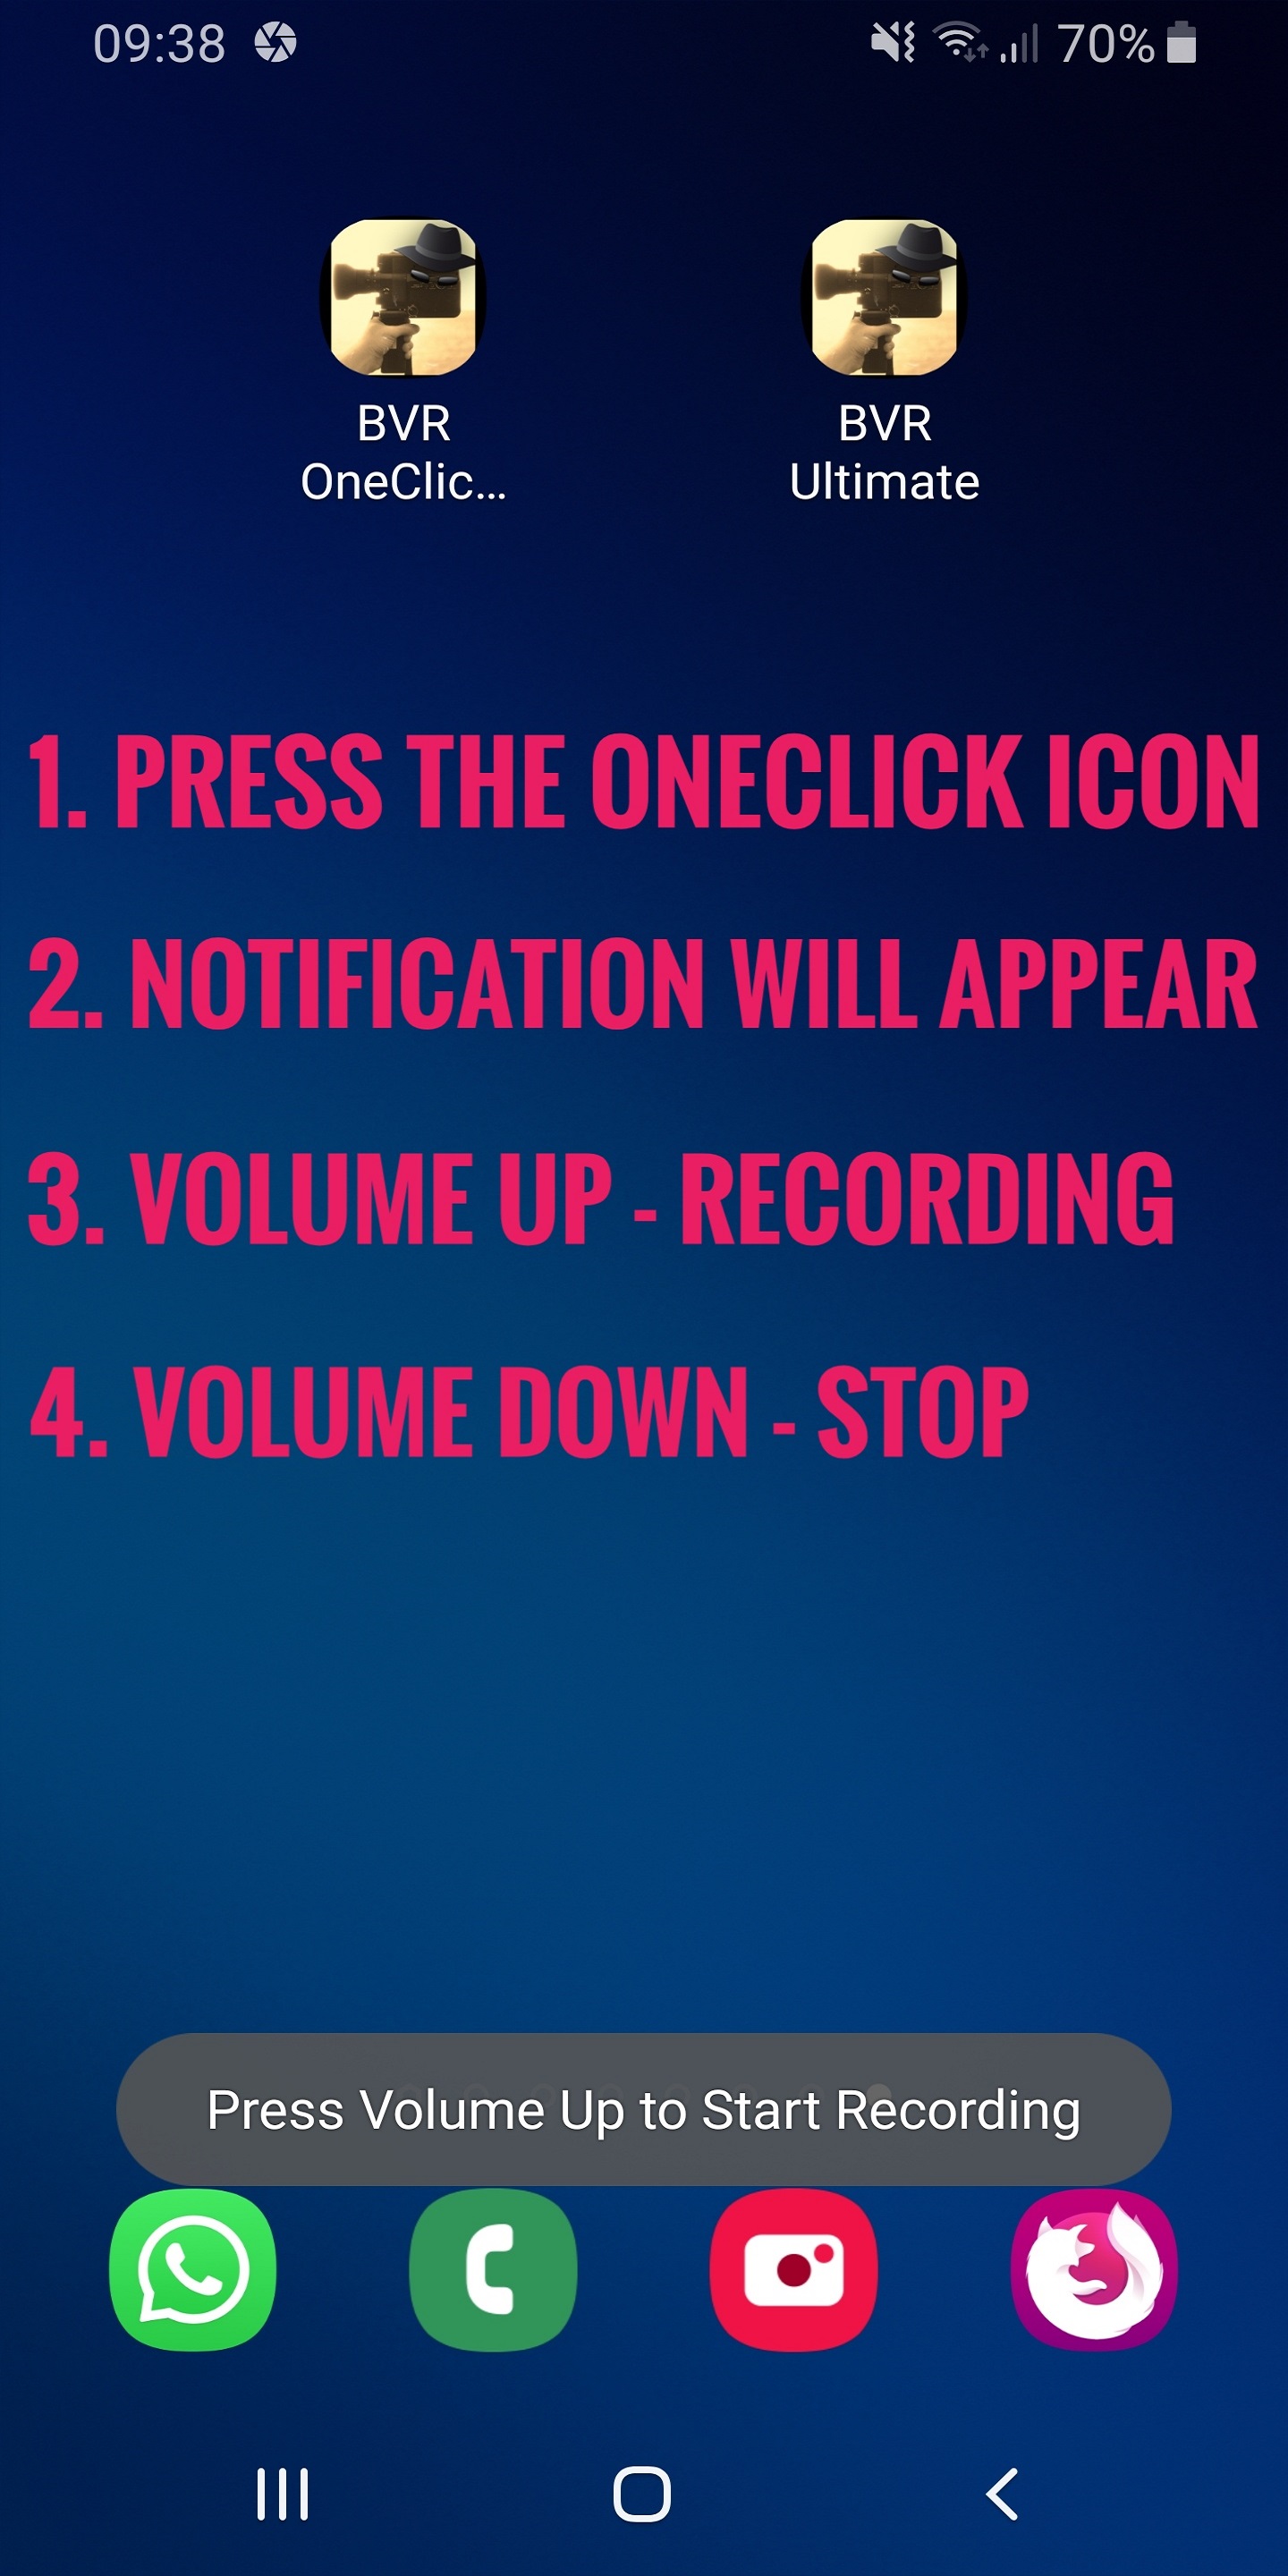
2. How to record using the Volume buttons
Press the "BVR OneClick" Icon
Notification will appear on the upper menu with camera icon
Short message will appear explaining that you need to use the volume button
Volume Up - Start recording
Volume Down - Stop recording
Please pay attention
Pressing Volume Up while recording - will restarts the recording and not stop the recording.
As requested by users before.
Can I use the earphones volume buttons?
Yes, you can. You can even use the Wireless Bluetooth earphones Volume up and down buttons.
If you use the volume buttons: Use the "Vibrate on recording" option to be sure recording started
3. How to make a snapshot while recording?
Press the small camera icon to create a snapshot in the highest resolution possible
If you choose in the setting - you can also make a snapshot while pressing the power or the home button
If you choose in the setting - you can also make a snapshot while pressing the power or the home button
make sure that:
1. you are recording.
2. in the setting - "User Camera2 API" is selected

4. Can't save to External SD?
If you bought the premium version, you can save on the SD car.
You need to choose and select the Directory on the SD card
Press the "Show SD" on the right hidden menu

5. BVR Ultimate shuts down after a while?
Android operational system closes application to save battery after a while.
From the Settings activate the pemission wizard,
on the 3rd step you will be navigated to battery optimization panel.
choose "All" to show all application in the list and then uncheck BVR Ultimate
Pay attention that recording is stopped by Android after it reaches 4GB, to solve it, check "How to number 7"

6. BVR Ultimate Settings the Battery Optimization level
Volume buttons to record are sometimes closed by the android system to save battery.
We have Added Battery optimization levels in the settings:
Choose none if you do not use it.
Choose Normal or Aggressive if you want the volume buttons to be active even if device go to deep sleep.
Do not skip step "5. BVR Ultimate shuts down after a while?"

7. Manufacturer specific - BVR Ultimate shuts down after a while?
Manufacturer have their own specific Battery optimization
In many case they are closing application in the background.
For more details and tweaks - check out this wonderful guide:
Don't kill my app!
Specific for Xiaomi Redmi:
Show our application to the recent application list like that:
In the Settings->Hide from recent list->Show.
Then unlock the application like that:
https://www.softwarert.com/lock-background-apps-xiaomi-redmi-phones/

8. Can I mute the Shutter sound when recording starts?
Mostly yes, try the following alternatives:
In the settings, make sure "Mute recording Chime" is checked.
When you select it in the first time it will redirect you to "Do not disturb" panel
Scroll for "BVR Ultimate" and select it from the list.
(Some countries like Japan forbid by law from android devices to mute notifications sound.
You can however, mute the notification sound from the phone sound panel.

9. BVR Ultimate video recording stops after 4GB reached
In the setting menu, in the "Continuous recording" choose "Set Car Mode"
It will activate maximum recording time as unlimited and split the file every 10 minutes so it won't reach the file maximal limits.
You can also select other video split time(depending on the resolution that you choose)

10. BVR Ultimate general error, what can I do?
1. Re-run the permissions wizard.
From the Settings scroll to the end and select the "Permission Wizard"
Approve all permissions.
2. Uninstall & Install the application.
Sometimes google play reduce updates file size and sometimes it doesn't work.
reinstalling the app will fix it. It will not delete your videos files or your purchases.

11. Background service won't close!!
If you cannot see the buttons, slide-open-down the notification bar:
1. "Stop/Start" recording from the middle button.
2. "Exit" to stop the recording properly & exit the application.
3. "Terminate" - use this as last resort. this will terminate the service and the application itselfs.
for example: if you have started BVR recording and afterward opened camera application the BVR will not be able to close the video file.
This will clear the service from memory. Video file will not be closed properly.

12. How can I modify/hide the notification?
We cannot hide the notification, it is a role created by google to prevent applications from spying
on the user. And we fully approve of this method. We are very concerned about your privacy and security.
You can however choose a diffrent notification icon.
You can also minimized the text to "BVR"
In the setting->Notification and Behaviour: disable the "update notification". now it will not be written "record" in the notifications
However - you can modify your phone behaviour to yourself by implementing one of the following:
1. On android 10 - when the notification appears, long press it. press "details" and disable notification from our application.
For other Android versions you can check the following guide:
Disable Notification guide
2. Stop Samsung’s App Permission Monitor From Displaying Notifications
Stop Permission monitor
3. Hide Sensitive Notifications on Your Android Lock Screen
Hide Sensetive notification
4. Stop Camera & Audio permission warning on Android 10
To do this, go to Settings->Apps & notifications->Tap 'Show all x apps'->Tap 3 dots in top right corner->Tap 'Show system'->Scroll down to find 'Permission controller' and tap on it->Tap 'Notifications'->Tap the text 'Permission reminders'->Tap the box with the text 'Silent' in it, and then flip the switch 'Minimize' to ON position.
This will prevent the Notification from making any sound, remove the icon from notification bar and put it in a separate category in the notification pane.
Hide Permission warning

13. How to motion Detect?
First of all : Select "Camera2 API" & "allow snapshots".Then the Motion detection will be available.
After pressing the green big button - you have 5 seconds to place the device.
Any movement will do one of the following and you can set it in the settings:
1. sound alarm.
2. capture image.
3. vibrate.
4. record video.
About video capture - it will record until it reach the maximum recording time that you have selected in the "Split video time".
Then it will return to motion detection.
Make sure you have enough light.

14. Motion detection + video recording?
Available only to Premium users
In the Settings:motion detection: select Start recording on motion
In the Split recording time, set Maximum recording time and split if needed.
If maximum recording is not selected - the video recording will not stop
those settings apply to normal video recording and also to recoring video following motion detected

15. Delete the other 2 Icons?
Most Launcher do not install Icons alone. Some do.
In the Settings:
* Special Features: Uncheck "Display One Click Icon"
* Special Features: Uncheck "Display Record Now Icon"

16. Better video quality?
You can try the following to make the video quality better:
- Settings:change the Resolutions, try also the beta resolutions. Beta resolution does not always works good but when it does it gives the best quality.
- Settings:Camera:check Camera2 API.
- Settings:Camera:try different Auto focus mode
- Setting:Advanced:check the stabilization mode
- Setting:Advanced:video codec : try H264 or H265
- Settings:Camera2 API:Video frame rate - 30 FPS
- Settings:Camera2 API:Video bitrate :
- Full HD (1920x1080): 10Mbps
- 4K (2840x2160): 48M~50Mbps
17. Run a corrupted video file with error icon on it
To avoid this problems - Please use the car mode that creates several files instead of a big one. But if you do have a corrpted file, try the following:
- Try to press the play button even though it shows an error message.
- Try to run it on Android using the VLC Player app.
- Try to copy it to the PC using a USB cable and run it using VLC PLayer.
- Copy the file to PC and try fixing it using VLC player like suggested in the following:
- Reconstructing video files using VLC Player
-
Without any liabilty from our side, we did find this app useful. use the following method that explained in this tutorial
Use "copy/b v1+v2" to create a double video file and repair "half" of it which is actually full video.but use it on the following application:
"Video repair tool" by Grau GMBH.:Video repair tool
18. How to get to 60 FPS:
- 1. stabilization off Settings:Advanced:Stabilization
- 2. Settings: Camera:Camera2 API: Checked
- 3. Settings: Camera:Preview on top: UN-Check
- 4. Settings:Camera2 API:Allow snapsshots: UN-Check
- 5. check different resolutions : in this case 4k beta resolution
19. Motion detection algorithm explained:
- Small animal 1 : looking for motion also in the 4 connectivity directions in the distance of 1 Pixels (up/down/right/left)
- Small animal 2 : looking for motion also in the 4 connectivity directions in the distance of 2 pixels (up/down/right/left)
- Best option: Small animal 3 : looking for motion also in the 8 connectivity directions in the distance of 4 pixels but counts only if 5 out of 8 are different (up/down/right/left and diagonal)
- Big Objects : looking for big connected objects
All motion detection are made after filtering the original image to grayscale and applying noise reduction filters.Comparing is done relative to reference image that is being modified in the rate of 8 pixels of the reference and 2 pixels for the new images.
Adaptive size algorithm should also be interesting. You can set the "Object connectivity" which means : how far to look for changes then the original suspected pixel (distance of x Pixels)and "How fast the adaptive background" which means how fast to get the reference image updated.
20. Video Quality optimization:
- Settings:Camera:Camera2API:checkSettings:Camera:Preview on top:Uncheck
- Settings:Camera:Autofocus:continous video
- Settings:Resolution:Beta try different ones
- Settings:Advanced:Stabilization mode:uncheck
- Settings:Advanced:Video Codec:try different ones
- Settings:Camera2API:Allow snapshots:disabledSettings:Camera2API:Video frame rate:30/60
- Settings:Camera2API:Video frame bit rate:high number
- Settings:Camera2API:Extermen Night mode:uncheckSettings:Camera2API:Super Extermen Night mode:uncheck
20. After upgrading to Android 11:Are you missing old videos?
If you see no videos after upgrading to android 11, or if you record videos and do not see those videos, it is because the file system handling changed and the ".nomedia" file needs to be deleted.
- You have 2 options of how to fix it:
- 1. You can manually delete the ".nomedia" file. it is a file that stops other galleries from viewing recorded files. it does not work on Android 11 since they change the way apps can handle files. you can still hide those files - but in a different folder "Downloads/KVRD" by selecting Settings:Special features:Hide from Gallery.
- 2. use my Android 11 Wizard from the left import button in the gallery or from Settings:About:Android 11:delete no media file & import files to android 11.
21. Disable the “Is Displaying Over Other Apps”
To quickly disable the notification, just toggle the slider to off. A note will display letting you know this notification won’t show up anymore. Again, this is only for the app that’s currently running—a new notification will show up if another app is displaying over other apps. This is a very granular setting.
Disable the “Is Displaying Over Other Apps”
